
Table of Contents
Step onto an archery range for the very first time, and the gear racks can look wonderfully overwhelming. Between the sculpted metal handles, long carbon stabilizer rods reaching forward like antennae, and quivers packed with vibrant arrows, it feels almost like walking into an aerospace engineering laboratory.
Here is the great secret of archery: beneath all the shiny carbon and aluminum, every single piece on a bow has one simple, logical job to do. Once you know what each component does and why it sits where it sits, the entire sport transforms from intimidating engineering into intuitive, graceful fun.
Let's take a modern recurve bow and a target arrow apart, piece by piece, and explain exactly how each part works together to send your arrow flying straight into the yellow bullseye.
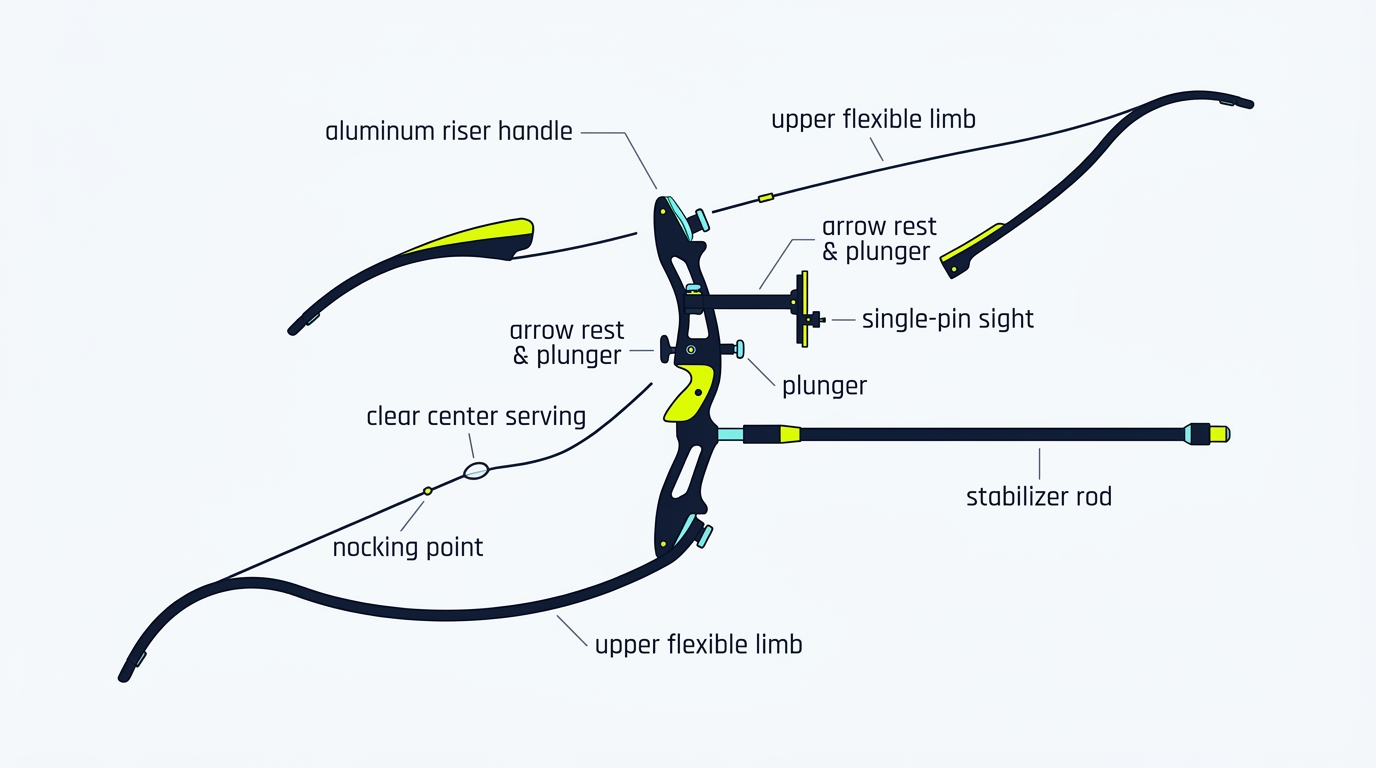
1. The Three Core Building Blocks of a Bow
No matter how many high-tech gadgets an Olympic champion bolts onto their setup, every functional bow relies on three fundamental structural components:
1. The Riser (The Chassis and Handle)
The Riser is the central structural backbone of the bow. It is the solid handle you hold with your bow hand, and it serves as the mounting platform for every other accessory:
- The Grip: The ergonomic contoured throat where your hand makes contact. A proper grip encourages relaxed pressure against your thumb muscle (*the thenar eminence*) without squeezing with your fingers.
- The Sight Window: The cut-out upper section of the riser that gives your aiming eye an unobstructed view of the target.
- Limb Pockets: The top and bottom sockets where the limbs click into place. Modern risers use the universal ILF (International Limb Fitting) system, allowing you to swap limb sets freely across different brands without replacing your handle.
2. The Limbs (The Engines of the Bow)
If the riser is the chassis of a car, the Limbs are the engine. Made from layers of fiberglass, wood, and aerospace-grade carbon foam, the limbs store potential energy as you draw the string back and snap forward instantly upon release to propel the arrow.
Recurve limbs get their name from their distinctive forward-curving tips. As you draw the string, these curves unroll slightly, storing far more kinetic energy and generating higher arrow speed than a flat, straight wooden limb.
3. The Bowstring (The Power Transmission Cable)
The Bowstring transfers the explosive elastic energy stored in the limbs directly into the back of your arrow. Modern strings are woven from ultra-strong synthetic fibers (such as *FastFlight* or *Dacron*) that do not stretch under tension:
- Center Serving: A tight protective nylon winding in the middle of the string that protects the main strands from finger wear and friction against your arm guard.
- Nocking Points: Small brass rings or tied thread knots clamped onto the center serving. They mark the exact millimeter where your arrow nock clicks onto the string, ensuring identical launch height on every shot.
2. Essential Bow Accessories and What They Do
To help archers replicate a consistent shot cycle 72 times in a row, modern bows utilize four key precision accessories:
1. Arrow Rest and Plunger (Berger Button)
The Arrow Rest is a tiny wire arm mounted inside the sight window that cradles the arrow shaft before release. Right beside it sits the Plunger (or Berger Button)—a spring-loaded metal cushion that presses against the side of the arrow shaft. The plunger acts like a shock absorber for your car: it absorbs the violent horizontal wobble (*the Archer's Paradox*) as the arrow bends around the riser during release, keeping the flight trajectory dead straight.
2. The Sight and Pin
Mounted to the front of the riser, the Sight features a movable vertical elevation bar and horizontal windage track with a bright glowing aiming pin. By adjusting the sight up, down, left, or right, you calibrate the bow for distances ranging from 18 meters indoors up to 70 meters outdoors.
3. The Mechanical Clicker
A Clicker is a thin, flexible spring-steel blade mounted over the arrow shaft. As you reach full draw and expand your chest muscles the final millimeter, the tip of the arrow slides out from under the blade, creating a sharp audible *click*. That sound is the archer's subconscious cue to release instantly, guaranteeing that every shot is launched from the exact same draw length.
4. The Stabilizer Rod
The long carbon fiber pole sticking out from the front of the riser is the Stabilizer. Just like a tightrope walker carries a long balance pole, the stabilizer increases the bow's rotational inertia. It prevents your bow hand from twisting during release and absorbs post-shot vibration, making the bow feel remarkably smooth and calm in your hand.
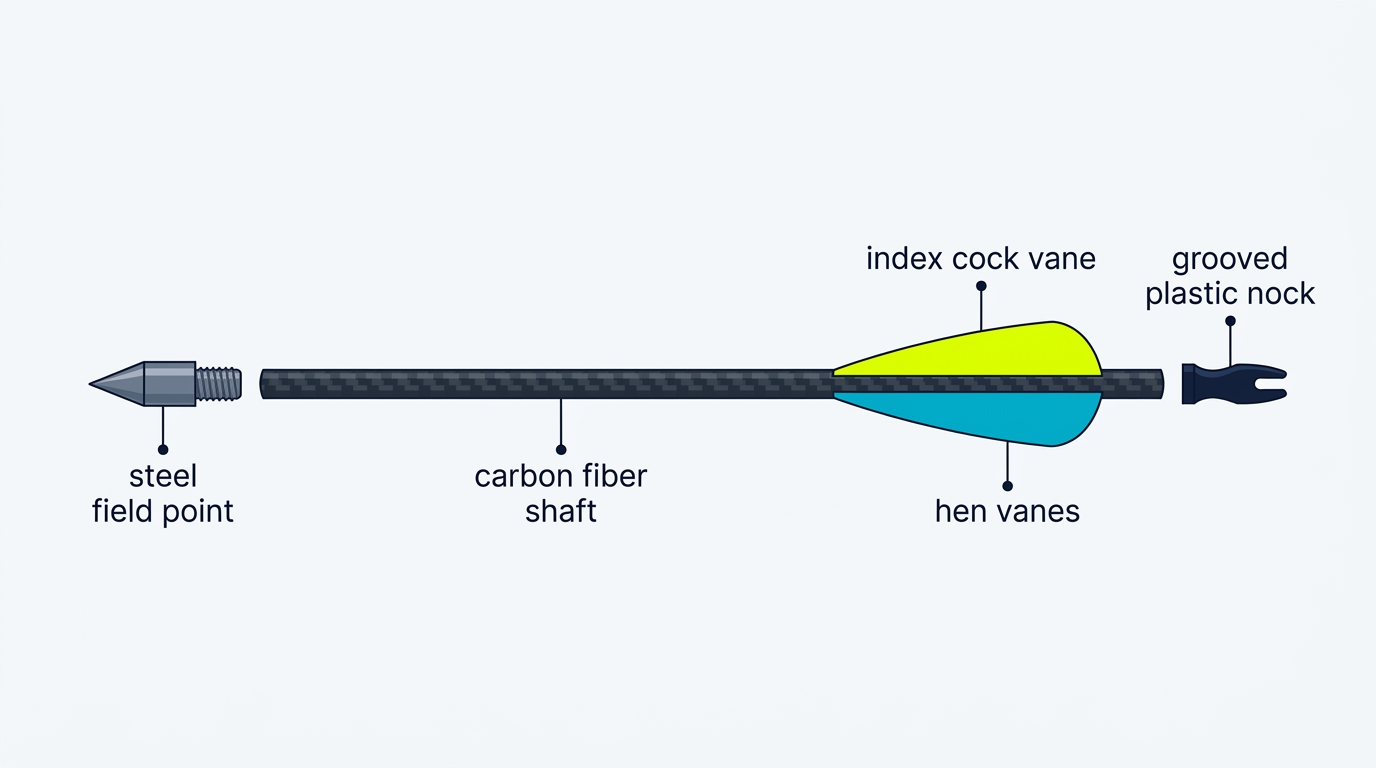
3. Anatomy of an Arrow: The Four Essential Parts
An arrow is not just a simple wooden stick; it is a high-speed projectile precision-engineered to flex, stabilize, and slice cleanly through crosswinds. Every modern target arrow consists of four parts:
1. The Field Point (Tip)
The bullet-shaped metal tip glued into the front of the arrow shaft, weighted in grains (typically 70 to 120 grains). Its aerodynamic shape penetrates target foam smoothly without tearing up the target face.
2. The Shaft (The Body)
The hollow carbon fiber or aluminum tube that forms the body of the arrow. The most critical specification of a shaft is its Spine (Stiffness)—how much it flexes when pushed by the bowstring. A shaft that is too stiff or too weak will wobble erratically in flight.
3. The Fletchings / Vanes (The Wings)
Three aerodynamic plastic vanes or feather wings glued to the rear of the shaft. As the arrow flies, fletchings create stabilizing drag that induces a gentle bullet-like spin, straightening the arrow flight within the first 10 meters. Notice that one vane has a distinct contrasting color: this is the Index (or Cock) Vane, which points away from the riser to prevent the plastic from slapping against the bow handle during launch.
4. The Nock (The Connection)
The slotted plastic cap at the very back of the arrow. It clicks firmly onto the center serving between the nocking points, ensuring the arrow stays securely attached to the bowstring until you release.
4. Quick-Glance Equipment Component Reference
Here is a summary table comparing every core part of your archery setup and its primary function:
| Component Name | Location on Setup | Primary Function | Beginner Tip |
|---|---|---|---|
| Riser | Center handle of the bow | Structural chassis and mounting platform | Choose an ILF-compatible riser so you can upgrade limbs affordably. |
| Limbs | Top and bottom of the riser | Stores and releases kinetic power | Start with light limbs (20–24 lbs) to build solid muscle memory. |
| Bowstring | Connecting limb tip to limb tip | Transfers limb snap to the arrow | Apply synthetic string wax monthly to prevent fraying strands. |
| Plunger (Berger) | Screwed through the riser window | Cushions horizontal arrow wobble | Keep spring tension medium; crucial for straight arrow groups. |
| Arrow Shaft | Main projectile body | Carries kinetic energy to target | Match arrow spine stiffness to your draw weight and draw length. |
| Fletchings | Rear of the arrow shaft | Stabilizes flight and induces spin | Always face the contrasting index vane away from the riser. |
| Nock | Rear tip of the arrow | Locks arrow to the string serving | Listen for a distinct, clean 'click' when seating on the string. |
5. Daily Equipment Care: Three Golden Rules for Beginners
Taking proper care of your bow and arrows ensures your equipment remains safe, accurate, and long-lasting:
1. Always Unstring Your Recurve Bow When Not in Use
Leaving a recurve bow strung for weeks inside a closet keeps the limbs under continuous 20-to-30-pound tension. Over time, heat and moisture will cause the limb tips to twist (*limb warp*), permanently ruining your accuracy. Use a bow stringer tool to unstring and pack your limbs flat after every shooting session.
2. Perform the "Flex Test" on Carbon Arrows
If an arrow hits a hard target frame or collides with another arrow in the 10-ring, hold both ends of the carbon shaft and gently flex it into a slight arc while listening closely. If you hear a crackling sound or see hairline carbon fibers splintering, retire and discard the arrow immediately. Shooting a damaged carbon arrow can cause it to shatter into your hand upon release.
3. Keep Your Bowstring Lightly Waxed
Dry, un-waxed bowstrings become fuzzy and brittle over time. Rub a small dab of synthetic archery bowstring wax along the exposed fiber strands every 3 to 4 weeks, then briskly burnish it in with a small piece of clean leather until the friction melts the wax deep into the core bundles.
Summary: Confidence Starts with Understanding Your Gear
When you understand the purpose of every screw, limb pocket, and fletching vane, archery stops being an intimidating mystery and becomes an empowering craft. Every component is working in complete harmony to translate your calm body alignment into a clean, satisfying shot into the yellow ring.
Ready to discover your exact sizing? Continue your journey with our guide on Draw Length and Draw Weight for Beginners: How to Find Your Perfect Fit.

Dedicated to delivering clear, authoritative, and practical archery education and tournament insight.